








Riding Mower Hour Meter: Universal Installation
Installing an hour meter on your riding mower is a simple yet crucial step for proper maintenance. This guide provides a universal approach to wiring, mounting, and using an hour meter on various riding mower brands.
Introduction: Why Use a Riding Mower Hour Meter?
A riding mower hour meter is a small investment that can significantly extend the life of your equipment. It accurately tracks the engine's run time, allowing you to schedule essential maintenance tasks like oil changes, filter replacements, and spark plug inspections with precision. Instead of guessing when these services are due, you'll have a reliable record to follow, preventing costly damage and ensuring optimal performance. This is especially helpful if you have a fleet of mowers from brands like John Deere, Craftsman, Cub Cadet, Husqvarna, Toro, Ariens, Murray, Hustler, Scag, Exmark, Ferris, Snapper, Simplicity, and Dixie Chopper. Over time, sticking to a consistent maintenance schedule based on run time, not calendar dates, will save you money and hassle.
Recommended Parts for This Guide
1 part we recommend — in stock, ships fast, one-click add to cart.
🔍 Looking for a specific part? Try our AI Part Finder — tell it your equipment and what you need, and it will find matching parts instantly.
Think of it like this: you wouldn't drive your car without an odometer, would you? A riding mower hour meter is your lawnmower's odometer, helping you keep track of its vital statistics and ensuring it runs smoothly for years to come. Knowing exactly when to replace your belts, filters, or even inspect your blades becomes much easier with this simple tool.
Tools and Materials Needed
Before you begin, gather the necessary tools and materials:
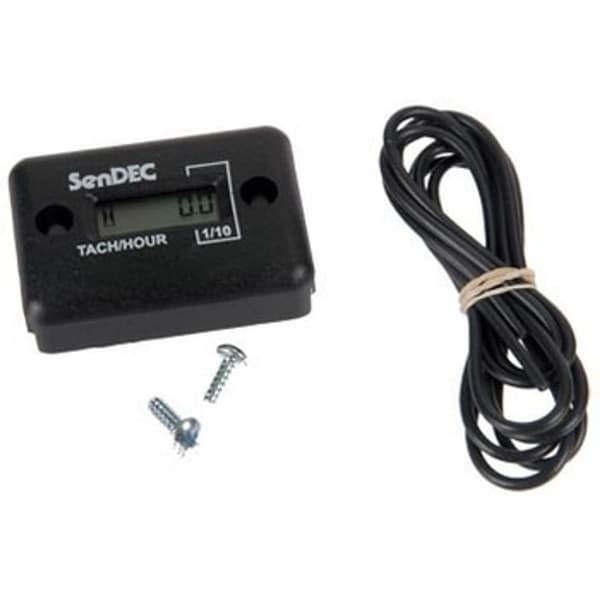
- Riding Mower Hour Meter: Choose a universal hour meter compatible with small engines. Many are inductive and easily mount to your mower’s frame.
- Wire Strippers/Crimpers: For preparing and connecting wires.
- Electrical Tape or Heat Shrink Tubing: For insulating connections.
- Screwdriver Set: To remove panels and secure the hour meter.
- Drill (Optional): If you need to create a mounting hole.
- Zip Ties: For securing wires and keeping them tidy.
- Multimeter (Optional): To verify electrical connections.
- Gloves and Safety Glasses: For personal protection.
Understanding Different Types of Hour Meters
There are a few types of hour meters available, but the most common for riding mowers are:
- Inductive Hour Meters: These are the easiest to install. They don't require direct wiring into the electrical system. Instead, they sense the magnetic field generated by the spark plug wire.
- Direct Wired Hour Meters: These require a connection to the mower's electrical system, usually to a 12V power source and ground.
This guide will primarily focus on installing an inductive hour meter, as it offers a simpler and safer installation process. However, the principles of mounting and securing the meter apply to both types.
Safety First: Preparing Your Riding Mower
Safety is paramount when working on any electrical or mechanical equipment. Follow these precautions before starting:
- Disconnect the Spark Plug: Remove the spark plug wire from the spark plug to prevent accidental starting. This is a crucial step for safety. You can find replacement spark plugs at Madison Tractor.
- Disconnect the Battery (Recommended): For added safety, disconnect the negative (-) terminal of the riding mower battery. Refer to our guide on riding mower battery sizes if you ever need a replacement.
- Engage the Parking Brake: Ensure the mower is securely parked and the parking brake is engaged.
- Wear Safety Glasses and Gloves: Protect your eyes and hands from potential hazards.
- Work in a Well-Ventilated Area: If you're working indoors, ensure adequate ventilation to avoid inhaling fumes.
Step-by-Step Installation Guide: Inductive Hour Meter
Follow these steps to install an inductive riding mower hour meter:
- Choose a Mounting Location: Select a convenient and visible location for the hour meter. Common locations include the dashboard, steering column, or near the engine. Make sure the area is clean and free of debris.
- Mount the Hour Meter: Most inductive hour meters come with adhesive backing or mounting screws. If using adhesive, clean the mounting surface with alcohol to ensure a strong bond. If using screws, you may need to drill pilot holes. If mounting to a bar or frame, consider using specialized vertical or horizontal bar clamps for a secure fit.
- Wrap the Wire Around the Spark Plug Wire: The inductive hour meter has a wire that needs to be wrapped around the spark plug wire. Wrap the wire around the spark plug wire 3-5 times, ensuring a tight and secure fit. Follow the instructions included with your specific hour meter.
- Secure the Wire: Use zip ties to secure the wire to the spark plug wire and the surrounding area. This will prevent the wire from getting caught on moving parts.
- Conceal and Protect the Wire: Route the wire away from any moving parts, heat sources, or sharp edges. Use zip ties or electrical tape to secure the wire and protect it from damage.
- Reconnect the Spark Plug: Reconnect the spark plug wire to the spark plug.
- Reconnect the Battery (If Disconnected): Reconnect the negative (-) terminal of the battery.
- Test the Hour Meter: Start the engine and let it run for a few minutes. The hour meter should start counting the engine's run time.
Troubleshooting Common Issues
If your hour meter isn't working correctly, consider these common issues:
- Loose Wire Connection: Ensure the wire is securely wrapped around the spark plug wire.
- Weak Battery (Direct Wired): If you have a direct-wired hour meter, check the battery voltage. A weak battery may prevent the meter from functioning correctly. Consider our selection of riding mower batteries.
- Faulty Hour Meter: If you've checked all the connections and the hour meter still isn't working, it may be faulty and need to be replaced.
Maintaining Your Riding Mower for Longevity
Using an hour meter is just one aspect of proper riding mower maintenance. Remember to:
- Change the Oil: Follow the manufacturer's recommendations for oil change intervals, using the hour meter as your guide.
- Replace Filters: Regularly replace the air filter, fuel filter, and oil filter. Madison Tractor offers a wide selection of filters for various mower brands.
- Inspect and Sharpen blades: Check your mower blades regularly for damage and sharpness. Sharpen or replace them as needed.
- Check Belts and Pulleys: Inspect your belts and pulleys for wear and tear. Replace them if they are cracked, frayed, or damaged. Proper belt tension is also crucial. Don't forget to inspect your spindles and pulleys for wear.
- Grease Fittings: Lubricate all grease fittings regularly to ensure smooth operation.
- Inspect the Ignition System: Periodically inspect your lawn mower ignition coil, ignition switch, starter solenoid, and starter motor to ensure they are functioning correctly. Also check the voltage regulator to ensure proper charging.
By following these maintenance tips and using your riding mower hour meter, you can keep your machine running smoothly for years to come.
Conclusion
Installing a riding mower hour meter is a straightforward process that offers significant benefits. By accurately tracking engine run time, you can schedule maintenance tasks with precision, extend the life of your equipment, and save money in the long run. Whether you own a John Deere, Craftsman, Cub Cadet, or any other brand of riding mower, an hour meter is a valuable addition to your maintenance toolkit.
Shop Riding Mower Parts at Madison Tractor
Madison Tractor Company is your one-stop shop for all your riding mower parts needs. We carry a wide selection of high-quality parts for various brands and models, including John Deere, Craftsman, Cub Cadet, Husqvarna, Toro, and more. From belts and blades to filters and electrical components, we have everything you need to keep your riding mower running smoothly. Browse our online catalog or contact our knowledgeable team for assistance in finding the right parts for your machine. We also carry a wide selection of PTO switches and seat safety switches. Shop with confidence at Madison Tractor Company! You can also use our AI-Powered Part Finder to search for parts by your specific make and model.
Part of our comprehensive guide
Mower Electrical Parts Guide: Starters, Solenoids, Switches & More