Service Instructions for Repair
of
Marvel-Schebler Model TSX
Series Carburetors
Click here to purchase the 8N carb kit.
Check identification number on carburetor to determine that repair kit is applicable to numbers shown.
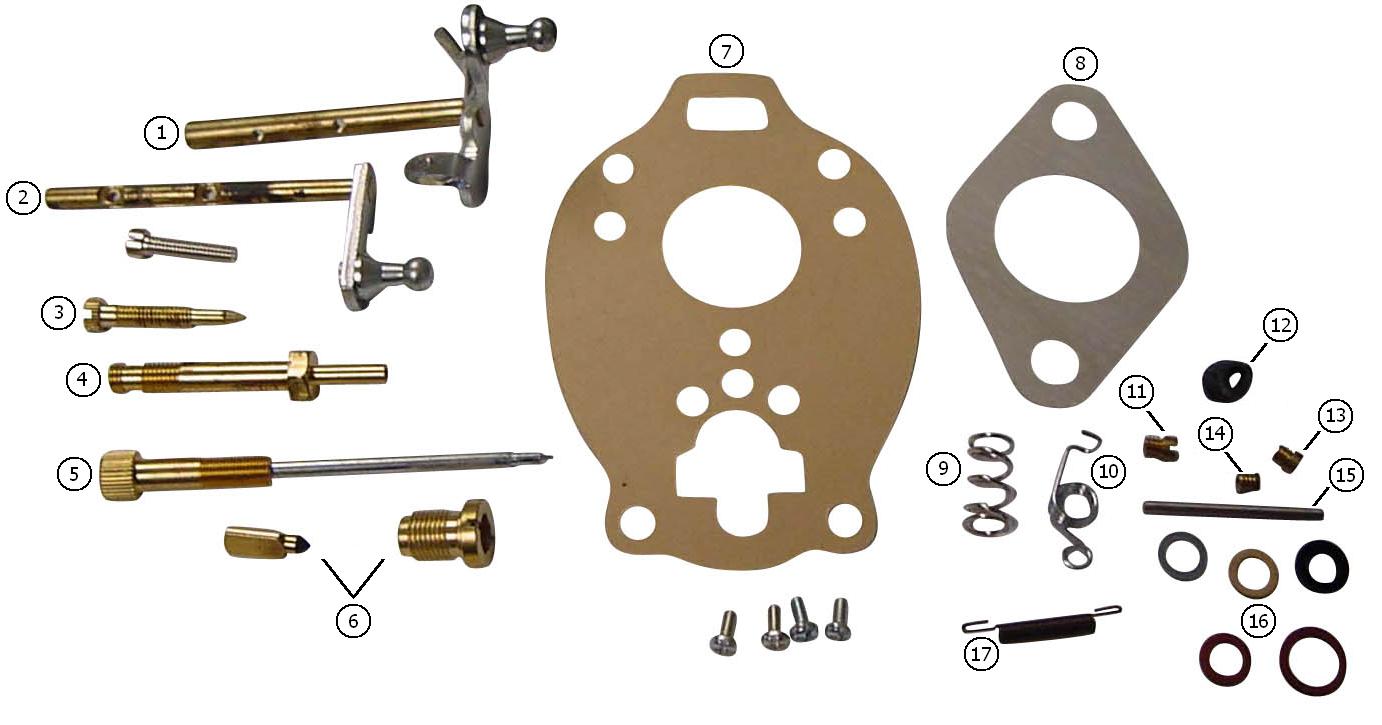
Key:
1 - Throttle shaft lever
2 - Choke lever
3 - IDLE/Fuel adjust needle
4 - Main nozzle
5 - Power adjustment needle
6 - Needle and seat
7 - Center gasket
8 - Base gasket
9 - Spring-power adjustment needle
10 - Throttle spring
11 - IDLE jet
12 - Throttle shaft cup
13 - Power jet
14 - Economizer jet
15 - Float lever pin
16 - Seals & ‘O’ rings
17 - Return spring
Separate upper body from lower body taking care to avoid damage to float. Remove and save all parts from upper & lower bodies.
1 - Clean both castings thoroughly in carburetor solvent and gasoline if solvent is not available.
2 - Blow out all channels and passages with compressed air. Be sure castings are clean.
Reassemble the carburetor
(Always install all parts contained in kit.)
1 - Carefully inspect all parts to make sure that they have been thoroughly cleaned and all jet passages are clear.
2 - Install throttle shaft, retainer and packing in position, then insert throttle plate. Back off idle screw on throttle shaft so throttle plate will close tight. Insert screws and tighten securely. If throttle shaft binds, turn to closed position and lightly tap shaft directly over center of throttle plate.
3 - Install economizer jet (some models do not use this jet).
4 - Install idle jet.
5 - Install idle adjusting needle and spring.
6 - Install float valve assembly and gasket.
7 - Install bowl to body gasket and venturi in casting.
8 - Install float and lever assembly and float axle.
9 - To adjust float for correct fuel level, place throttle body flange down and bend float lever close to float body so the float measure ¼” from face of gasket to nearest edge of float. Do not bend float hinge.
10 - Install air shutter shaft, packing and retainer.
11 - Install air shutter bracket, air shutter returning spring and insert air shutter plate. Be sure plate is properly centered before tightening screws securely.
12 - Install power jet.
13 - Install main nozzle and gasket.
14 - Install power adjusting needle assembly. (For TSX-33 on Ford tractors, use new type hi-speed needle assembly with spring and washers supplied and remove ratchet stop.)
15 - Install gasoline drain strainer and strainer plug.
16 - Assemble upper and lower body being careful to avoid damage to float. Use precaution to let venturi guide bodies into position.
17 - Install assembly screws and lock washers. Tighten evenly and securely.
Primary adjustments
1 - Set idle screw on throttle shaft 1-1/4 turns off stop pin.
2 - Set idle adjusting needle one full turn off seat.
3 - Set power adjusting needle one full turn off seat.

